Replacing Subfloor in Old House: A Step-by-Step Guide
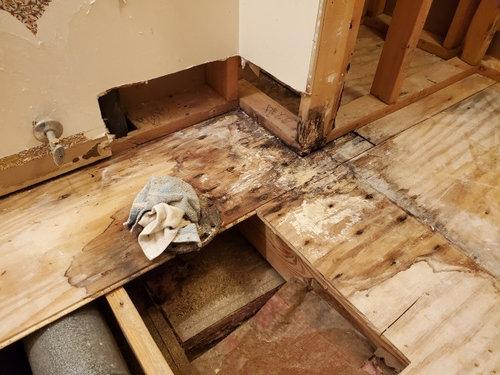
Older homes have a charm and character that newer builds often lack — but they can also come with structural issues that need attention. One of the most common problems homeowners face in aging properties is a damaged or unstable subfloor. Over time, water damage, rot, or just general wear can compromise the subfloor, leading to squeaky floors, sagging, or even unsafe conditions.
If you’re tackling the challenge of replacing subfloor in old house, this comprehensive guide will walk you through the process, from identifying when it’s time to replace to key steps for a solid, long-lasting repair.
Why Replace Subfloor in an Old House?
The subfloor is a critical part of your home’s flooring system. It sits between the floor joists and the finished flooring (like hardwood, tile, or carpet) and provides a stable, even surface. In old houses, subfloors may have deteriorated due to:
-
Water leaks from plumbing, roofs, or appliances
-
Prolonged exposure to moisture and humidity
-
Termite or pest damage
-
Poor initial construction or outdated materials
-
Heavy foot traffic over decades
Signs that you may need to replace the subfloor include:
-
Squeaking or spongy spots when you walk
-
Noticeable sagging or uneven floors
-
Mold, mildew, or musty odors
-
Visible rot or crumbling wood when you remove finished flooring
Tools and Materials Needed
Before replacing the subfloor in an old house, gather the right tools and materials:
-
Pry bar and hammer
-
Circular saw or reciprocating saw
-
Measuring tape and chalk line
-
Drill and screws
-
New subfloor panels (typically plywood or OSB)
-
Construction adhesive
-
Safety gear (gloves, goggles, dust mask)
Steps for Replacing Subfloor in an Old House
Step 1: Remove the Finished Flooring
Carefully remove the existing flooring material (hardwood, tile, vinyl, etc.) to expose the subfloor. In very old houses, you may find layers of different flooring materials that have been added over time — take your time removing these to avoid damaging the joists beneath.
Step 2: Inspect the Joists
Once the subfloor is exposed, inspect the floor joists for damage or rot. Any weakened joists should be repaired or reinforced before installing new subflooring. Look for signs of mold, insect damage, or sagging.
Step 3: Cut Out Damaged Subfloor
Use a circular saw to cut out the damaged sections of subfloor. Be careful not to cut into the joists below. Remove nails or screws holding the panels in place, and pry up the old subfloor.
Step 4: Prepare the Joists
Clean off any debris from the joists. If needed, sister new lumber to damaged joists to strengthen them. Check that all joists are level, as uneven joists can cause problems later.
Step 5: Install New Subfloor Panels
Apply construction adhesive to the joists to help reduce squeaks and create a stronger bond. Lay the new subfloor panels perpendicular to the joists, leaving a small gap (about 1/8 inch) between panels to allow for expansion. Secure the panels with screws driven into the joists.
Step 6: Check for Level and Finish Up
After installing the new subfloor, walk over it to check for stability and level. Fill any gaps or seams if needed. Once you’re satisfied with the work, you can proceed to install your new finished flooring.
Tips for Replacing Subfloor in an Old House
-
Always wear protective gear — older homes may have dust, mold, or even asbestos.
-
Take photos before you start for reference.
-
If you suspect serious structural damage, consult a professional before proceeding.
-
Consider upgrading to moisture-resistant subflooring if water damage was a previous issue.
-
Work systematically, replacing one section at a time to maintain stability.
Final Thoughts
Replacing subfloor in old house projects may seem daunting, but with the right tools, preparation, and patience, it’s a job many experienced DIYers can tackle. A solid subfloor not only improves the feel and safety of your floors but also protects your investment in any new flooring materials you install on top.
By addressing damaged or outdated subfloors, you ensure your historic home remains beautiful, functional, and safe for years to come.